How to Prepare 1099s in Sage Intacct
Article by Esther Goodstein, Not-For-Profit (NFP) Division Manager
This article will cover how to view and edit your vendor accounts within Sage Intacct, how to run 1099 reports to verify and review data before generating the 1099s, and how to generate your 1099 files for mailing to vendors.
Table of contents:
Viewing and Editing Vendors’ 1099 Status
To view a vendor’s status, create a custom view within the vendor list to easily identify 1099 vendors and accurately edit their information.
Creating a custom 1099 View in the Vendor list
Starting at the homepage, navigate to the vendor list by going to Accounts Payable and then Vendors.
Our view defaults to the 1099 list we will be discussing, but this may show one of your other preexisting views.
To create this new list click “Manage Views” and then select Create New View.

Utilize Intacct’s 1099 Update Feature
We have the ability to edit the 1099 name and contact information, and update any information in the system that may be outdated because of an old or missing W-9 form. This can be done in a few simple steps
Step 1: Select Columns
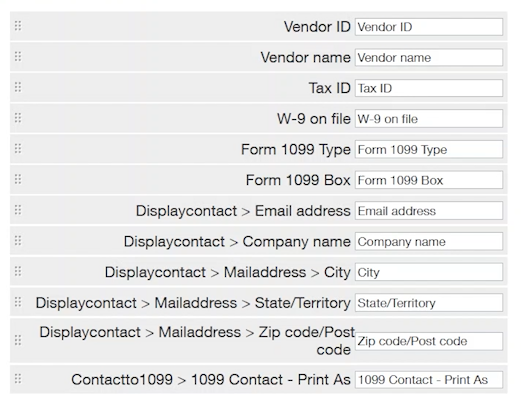
To edit an existing view, select “Edit” to display what information is included in that view. The first page allows you to select the columns you want to be displayed on the view. We have included the vendor ID, vendor name, 1099 Name, Tax ID, Form 1099 Box and Form 1099 Type.

Note: If you cannot see "edit" ask your team admin to grant you permissions
Under “Display contact”, you will select the contact information to be shown on the first page of the vendor card. This is how we track the addresses of our vendors.
Note:
If you have a specific contact for the 1099, you want to select the contact information in the “Contactto1099” section at the bottom of the page.

Once you have your columns selected, press Next.
Step 2: Select Column Sequence
On the second page you will choose the column sequence, selecting the order in which the columns will display on the actual list view.
You do this by clicking and dragging the columns into place.
Once completed, click Next to move on to the next page.
Step 3: Select Filters
We do not have any filters selected. However, you can filter to only show 1099 vendors by selecting the 1099 form box for the column section, and greater than or equal to for the operator section, and finally typing 1 in the Value section. This will work as long as all of your 1099 vendors have a form box selected.
Click Next.

Step 4: Sort Your Results
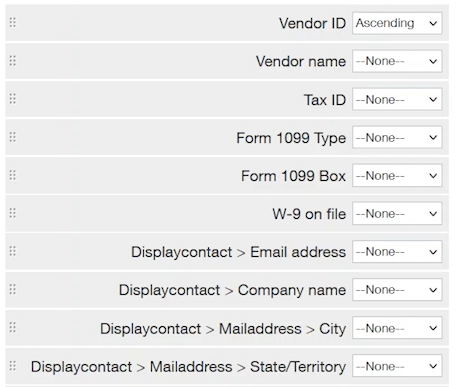
Here you will determine how your results will sort. We have selected ours to sort by the 1099 Form type. However, you can choose how you wish to sort your results. Again, here you will change the order by clicking and dragging the columns and then choose Ascending or Descending on your first column.
Click Next.
Step 5: Describe Your View
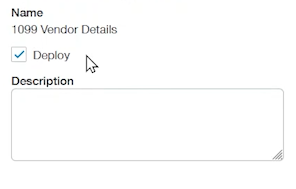
Choose a descriptive name for your view; ours is called 1099 vendors. Next you can choose whether or not to deploy the view. This means that other users can see and possibly edit your view if they have permissions in your system. Alternatively, you can leave Deploy unselected so that only you can see and edit this view.
Finally, you will press Save to save your new view.
You will then return back to whichever vendor list you were viewing when you selected to create the list. In our case, since we edited the list it has brought us back to our existing view. Click the view-selector arrow to select your correct list and that will generate your new list view.
On this view we can see what vendors are going to have 1099s generated, and edit them as needed.

Troubleshooting: Changing 1099 Type
Note: You will need to enter the beta interface.

Example: Incorrect Form 1099 Type
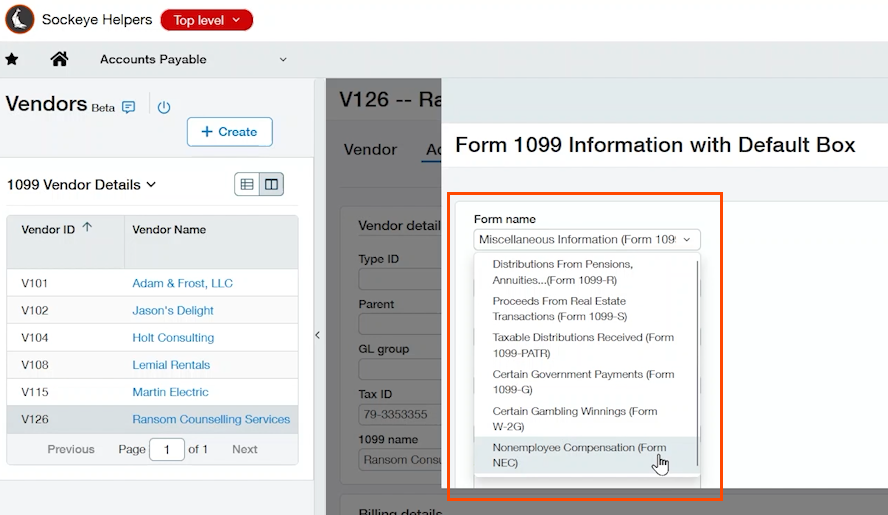
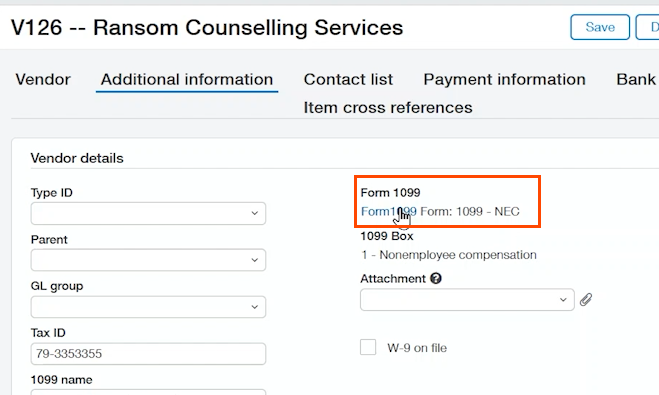
We see for our vendor Ransom Counseling Services that her Form 1099 Type is listed incorrectly as MISC when it should be NEC. To edit form type, select the Edit text next to her vendor ID; this will open a new window. Select Additional Information and under Vendor Details click “Form 1099” to open the Form 1099 Information, where you can change this to NEC. Then click to Save on this window. Then click Save again on the Vendor page to save the changes to her vendor record.
First Year in Sage Intacct
If this is your first year doing 1099s in Sage Intacct, there will be extra steps needed. For most people, when they go live on Intacct, they're not going live on January 1st. This means you may have some vendor open balances that need to be brought into Intacct to allow for the full 1099 process to be done within the system rather than having to use two different systems. If there are only a handful of vendors that need to have opening balances entered, you can do so manually in the user interface. If there is a large list of vendors that need to be added, you can do a vendor open balance import from an Excel spreadsheet.
Example: Manually Entering Vendor Open Balances
This is done from the vendor list page. Select Edit next to the vendor with the open balance, then select the Additional Information tab and click “form1099”.
In the Initial values for year box enter the year of the open balance. (Note that it will to default to the current year). After entering the year, select 1-Nonemployee compensation box and input the amount from the legacy system that is missing in Intacct. This number will be the bulk amount that shows up on the 1099 to make it accurate. Next, save your changes in the pop up window as well as on the vendor page.
Example: Importing Vendor Open Balances from a Spreadsheet
You would fill out a spreadsheet found in the Company Import Data page for each vendor that needs to be updated. This could be an export from your legacy system.
With the Intacct vendor ID, the name is not required but is shown for reference; then enter the 1099 form type, 1099 form box, and finally the actual open balance amount. Save the spreadsheet as a CSV file.
To import the spreadsheet you need to have admin permissions in Intacct. You (or an admin of the system) will navigate to Company, then to Import Data scrolling down to Accounts Payable, and select Import next to Vendor 1099 Opening Balances. Here you will select the year for the initial value, browse for your CSV spreadsheet and press Import. This will then add those open balances to those vendors.
If you need help with this, especially if you're a first-year client, please feel free to contact us. We can easily help you get through these steps.
Running 1099 Reports
Use the 1099 Reports feature to review and research vendors and amounts before generating your forms 1099/1096.
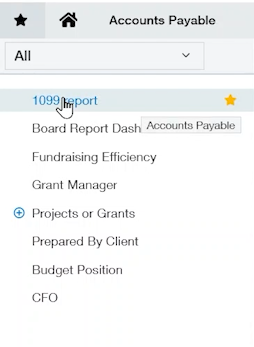
To run 1099 Reports in Intacct, go to Accounts Payable and under Reports on the far right, click 1099, and select 1099 report.

Tip:
For easier access, click on the star to add it to your favorites list
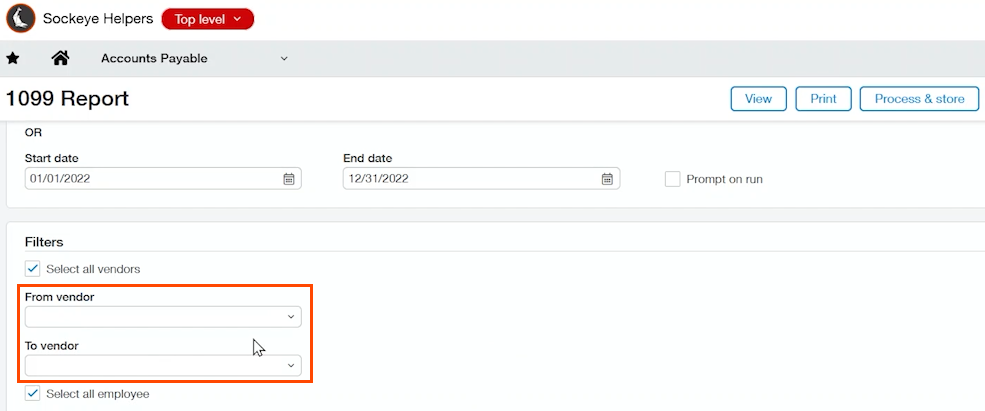
In the 1099 Report there are a lot of options to keep in mind. It will default to the current year so you want to make sure you change this to the year you want to report on for your 1099s. Your selected dates will always override the selection for “Reporting Period,” so you can ignore this selection unless you wish to use this instead of a date range.

You then have the option to run 1099 reports for all vendors, or select specific vendors from your vendor list. In this example we are going to select all vendors.
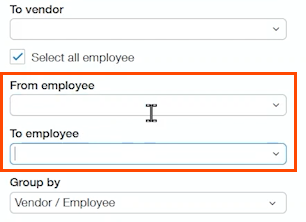
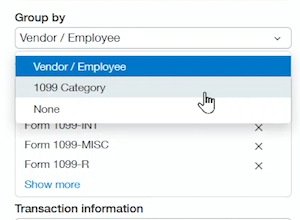
If you're doing employee reimbursements for employees that might have 1099s, you will make your selections here. If you don't, you can ignore these boxes. You can then choose to group by Vendors/Employees, 1099 Category, or None.
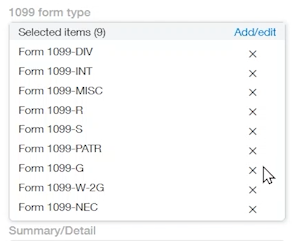
It is very important if this is your first time running 1099 reports in Intacct, you will want to make sure you select the form 1099 type. You can select to show all as it will show the types that have values. At minimum you must select the form types you need, otherwise the report will be blank. Note that it will remember your selections going forward.
For the Transaction information you can choose to show all transactions throughout the year for all vendors, or to only show transactions that have 1099 flags, or to show non-1099 transactions. This can help when you are looking for transactions missing a 1099 flag.
Selecting the option to show only minimum eligible amounts will remove any vendors that don't meet the threshold for 1099 filing from your report (e.g., eligible vendors that were paid less than $600 during the year).
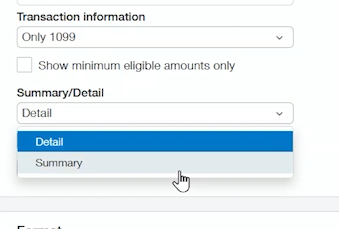
Next select Detail or Summary. Detail allows you to see every transaction that is part of that vendor's transaction list, while Summary will show only totals for each vendor.
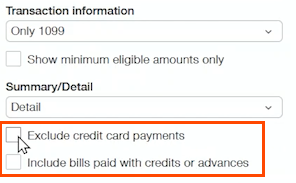
Below you can choose what to do with your credit card payments.
Now select View on the top options.

In our example, you see it is grouped by vendor and the report reflects the initial balances previously entered.
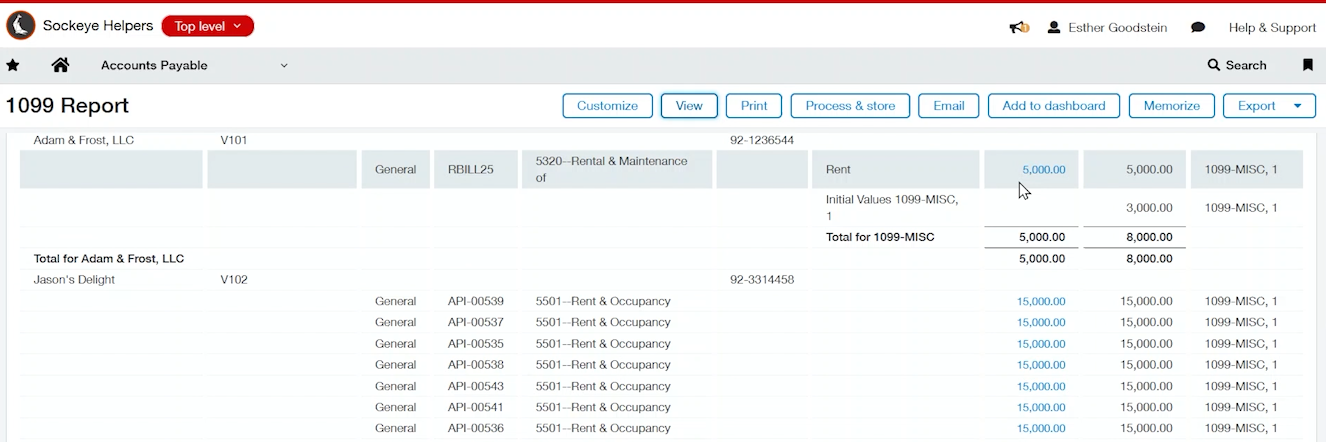
Also included are the multiple transactions listed for other vendors.
Report Considerations
Intacct defaults to the current year, so be sure to change this before running your reports
Select all form types you want to run the first time you run reports
Choose to run only 1099 for all transactions (unless you are using the report for other purposes aside from wanting to view all 1099 input)
Make sure you choose how to handle your credit card payments
Group by vendor or 1099 category if desired
Select Detail view to see individual transactions or Summary view to see the total transaction amounts for each vendor
Find and Reclassify Missing 1099 Accounts
Before you begin:
You must have Reclassification enabled for AP and 1099 Override on. You can find these settings in your AP configuration page which only your Admin can access.
Using the existing 1099 report, you can now change the parameters in order to find transactions that might actually be missing from it.
Select to Customize a report and choose to include just one vendor. In our example we will check to see if Amanda Workman's amounts are accurate, so we will enter that account under “From vendor”.

For Transaction Information, you can choose to run the report for only 1099 or select Show All if you wish to see all of the vendor’s transactions.
Next, be sure to select Detail to see each transaction.
Finally, check to ensure the dates are accurate, and then press View.
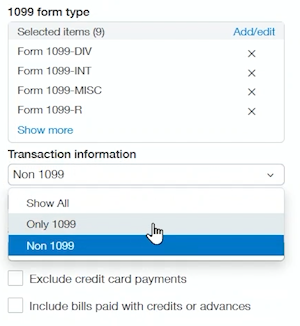
In this report, we will see a list of all the 1099 transactions and then any transactions that may be missing.

Here we see a transaction that was missed and therefore it won't show up on a 1099 when it's created.
Click the bill amount of that missing transaction to drill down and view the bill itself. Scrolling down to Entries, we verify that the 1099 box is not checked for the entry.

From here you can reclassify this entry to be included on the 1099.

make sure you're in Edit mode to view the Reclassify tab
Once you press Reclassify, the other thing that needs to turned on is the ability to do a 1099 override. This will give you the ability to check the 1099 box next to the missing entry, in order to click to Reclassify.
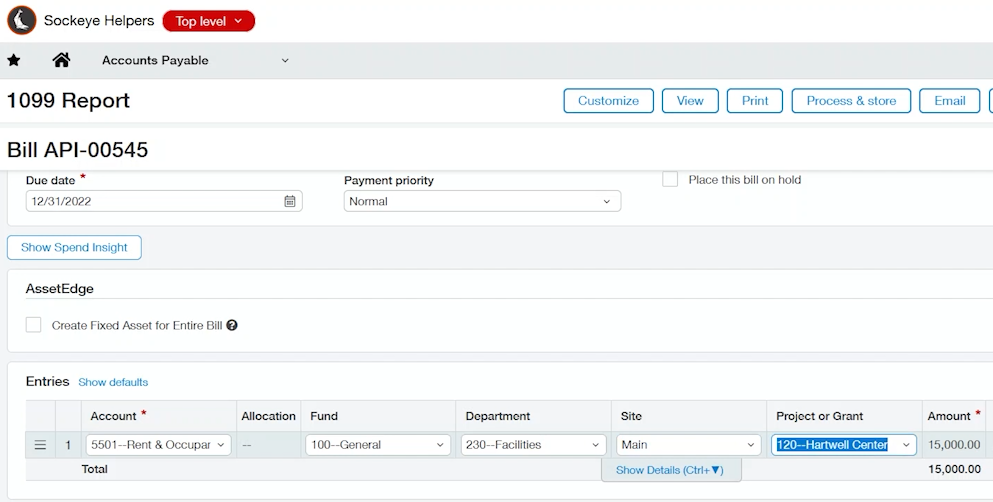
If the 1099 checkbox is grayed out, it means that 1099 override is not selected. And once again, this needs to be turned on within the AP configuration. Your admin or consultant can do that for you. Then you can turn it off again afterward if desired.

Once the box is checked, press Post. This entry will now automatically be added to the 1099 list and will show up when the 1099 report is generated.
Generate and Print 1099s
Once you are ready to generate and print your 1099s, navigate to Accounts Payable and under Reports click 1099.
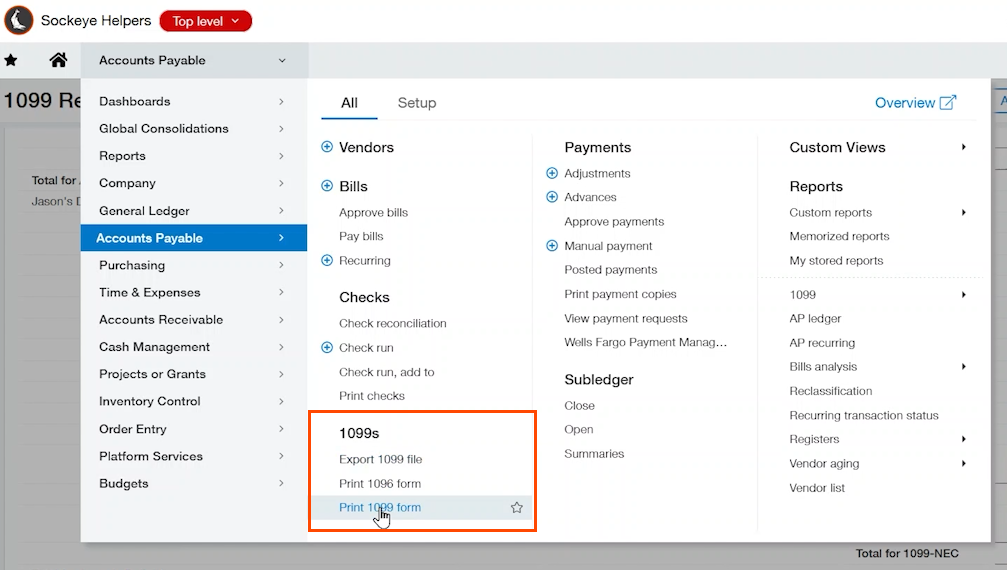
From here you will have two options:
Intacct 1099 Form:
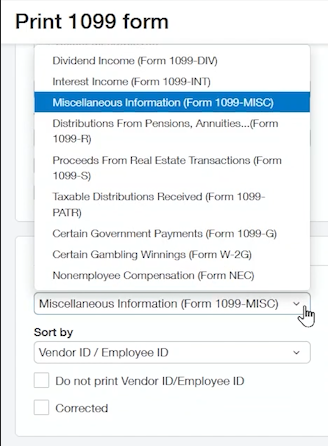
The first option is to print from Intacct directly to paper. This will generate a PDF file which can then be printed onto preformatted 1099 paper. You can then mail the 1099 to your vendor, or scan and send via email.
Selecting 1099 Form, first enter the correct year, select all vendors, choose the form you wish to print, and finally how you would like the report to be sorted (we recommend choosing vendor name over ID).
Press Print, and you will see a PDF with the basic information that should print correctly on preformatted 1099 forms or paper.

The other option is called a 1099 file. This creates a CSV file or an Excel file. Select this for electronic options as an E-file, or send this file to third parties to do the filing for you or for other data manipulations.

Select the 1099 create file and follow the same selections as instructed for the 1099 Form above. Once completed, you can click to export.
If you're sending it to a third party, we recommend selecting CSV, and then downloading the file on the next page.
3rd Party Options
Third party options can help you easily create, verify, and file your 1099 forms from Intacct. A few benefits of third-party 1099 services include:
Import 1099-qualified vendors and payments from Sage Intacct
Handle Federal and State compliant e-filing
Outsourcing for print & mail options
Most provide 24/7 support
Collect W-9 forms from your vendors online, and enable vendors to update and e-sign their forms
TIN matching service that compares information provided to the IRS
There are a number of third party options out there. If you're interested in this option we can get you set up with some demos and more information on what third parties might be the best fit for you and your team.
Good luck with preparing your 1099s in Sage Intacct!
About the author
Esther primarily serves our nonprofit clients with implementation and support on Sage Intacct. Equipped with an in-depth understanding of the accounting process across different industries, Esther serves as a wealth of knowledge for best practices and efficient processes.
She has nearly 6 years of experience in public accounting as a financial statement auditor.
Esther Goodstein, NFP Division Manager
